Why Robot Connectors Fail: Fretting, Wear and Contamination, and What to Specify Instead
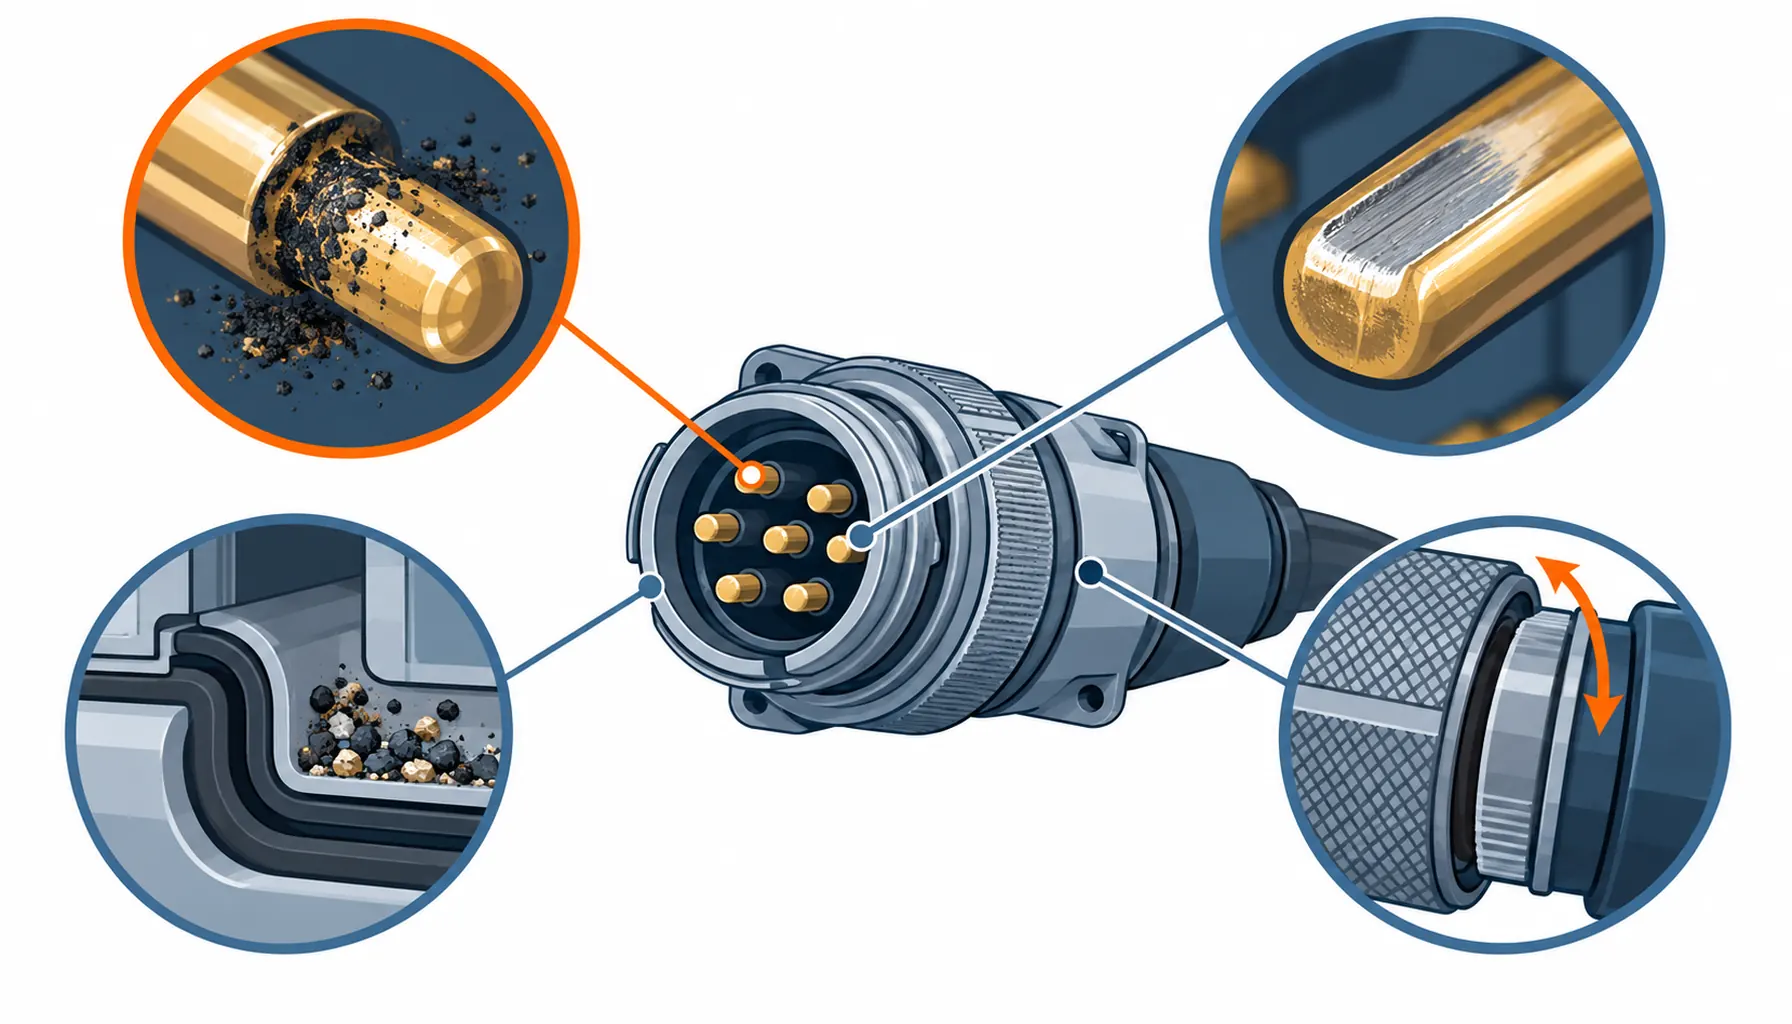
Quick Answer: Almost every robot connector failure comes from five causes: fretting corrosion, mechanical wear, contamination ingress, thermal and current ageing, and coupling looseness under load. Each leaves a different signature, which is what makes a connector fault diagnosable if you look at the failure rather than the catalogue. The point for buyers is that all five are decided before the order, in the plating, the sealing, the contact force and the locking, and none of them can be inspected into a finished part.
Introduction
A connector is the one part of an electrical system that is designed to be taken apart and put back together, and that is also why it is the most common source of a fault that no one can reproduce. The failure is rarely a clean break; it is a resistance that drifts, a contact that opens under vibration and closes again, a signal that drops only during a fast move. That is why buyers who treat the connector as a commodity part pay for it later, and why the five causes are worth knowing by their signatures rather than by their names.
The harness overview in our note on robot harnesses and connectors places the connector among the other elements. This guide stays on the failures: how to tell one cause from another, and what to write into the order to prevent each one.
Start by Separating Connector from Cable
The first split in any investigation is mechanical: if the conductor is broken, that is a cable failure, and no connector improvement fixes it. If the conductor is intact and the resistance is unstable, that is a contact failure and the connector is the place to look. The two produce different evidence: a cable failure shows damage along the run or at a bend, while a contact failure shows its history at the interface and in the plating. Our note on robot cable failure covers the cable side, and the wear patterns that point to a cable cause are catalogued in our note on cable damage and wear patterns.
The Five Ways a Connector Fails
Fretting corrosion is the vibration failure: small sliding motion at the interface breaks and reforms the metal boundaries, and on a tin-plated contact the exposed tin oxidises into an insulating layer that builds up until the joint opens. Mechanical wear is the cycle failure: repeated mating scrapes the plating away at the wipe track, so a high-cycle tool changer wears through a surface that a mated-once joint would keep for years. Contamination enters where the seal lets it, and a particle or a film of moisture at the interface raises resistance without any visible damage. Thermal and current ageing raises the contact temperature, softens the spring and speeds up every other mechanism. Coupling looseness lets the whole joint move under load, which turns a properly plated contact into a fretting contact and often damages the housing at the same time.
The Decision Table: Failure Causes and the Counter-Measures
| Cause | Signature | How to Verify | Counter-Measure to Buy | Prevention to Specify |
|---|---|---|---|---|
| Fretting corrosion | Dark oxide debris at the contact area, resistance drifting under vibration | Resistance measured before and after a vibration or micro-motion test | A plating that does not oxidise, over a proper underplate | Gold at the mating zone, a minimum thickness, and a porosity test |
| Mechanical wear | A polished or scraped track across the plating, failure localised to the wipe | Cycle the mating and measure resistance against cycle count | A contact rated for the number of mates the duty imposes | Mating cycle count written into the order with a matching contact rating |
| Contamination ingress | Particles or moisture film at the interface, resistance rising with no visible damage | Inspect the seal and the interface, and test IP on the assembly as fitted | A sealed interface rated for the actual environment | IP class for the assembly, with seal test evidence on the fitted part |
| Thermal and current ageing | Discolouration, softening of the housing, resistance rising at a loaded contact | Thermal imaging at full load and a current derating check | A contact sized well above the steady current, with headroom | Current per contact, derating at ambient, and a temperature rise limit |
| Coupling looseness | A backed-off or worn coupling ring, housing damage, motion at the joint | Torque and locking check under vibration, plus a load test | A locking mechanism that resists vibration rather than friction alone | Locking type, torque value, and a vibration qualification for the joint |
The First Hour of a Field Investigation
A connector fault is found by sequence, not by guesswork. Confirm the conductor first, so a cable failure is ruled out before the connector is blamed. Then look at the interface and the plating, because fretting, wear and contamination all leave visible evidence, and each points somewhere different: debris points to motion, a scraped track points to cycles, and a clean but resistive interface points to force or ingress. Then check the seal and the coupling, since a loose coupling explains both a resistance rise and housing damage. Only after those three checks is it worth swapping the connector, because swapping before you have read the evidence replaces the failed part with an identical one and schedules the same failure again.
Two measurements make the difference between a real diagnosis and a repair. Resistance measured across the joint while it is being vibrated or moved, which is the only test that catches an intermittent, and a thermal image taken at full load, which catches the ageing contacts that look perfect at ambient current.
What to Freeze Before the Order
| Item | What to State | Evidence to Attach | Cost of Leaving It Open |
|---|---|---|---|
| Plating system | Top layer and underplate, with a minimum thickness at the mating zone | A plating certificate and a porosity test | Fretting failure on every moving axis in the fleet |
| Mating cycle count | The cycles the joint will see, and a contact rated for that number | The contact maker's cycle rating for the duty | Plating worn through on high-cycle tool changers within months |
| Sealing for the assembly | IP class on the finished assembly, judged at the entry as well as the face | Seal test evidence on the fitted part | Contamination ingress that no plating can resist |
| Contact loading | Current per contact with derating at ambient, and a temperature rise limit | A current and derating calculation for the worst case | Thermal ageing that softens the spring and accelerates every other cause |
| Locking mechanism | Locking type and torque, chosen to resist vibration rather than friction alone | A vibration qualification on the mated joint | A coupling that backs off and turns a good contact into a fretting one |
| Normal force | Minimum force at the contact, maintained across the temperature range | A force measurement on the finished contact | A joint that is free to move whatever the plating |
| Mis-mate protection | Keying that makes a wrong mate physically impossible | A keying drawing and a first-article mis-mate trial | A forced wrong mate that damages contacts in a single shift |
| Field diagnostics plan | The test sequence and the instruments the maintenance team will use | A written procedure with the measurements to record | Connectors swapped on guesswork, and the same failure returning |
When Replacing the Connector Is Not the Answer
Where the motion is coming from the entry. A contact that frets because the cable entry lets the joint move will fail again on the replacement part. Fix the entry first; the mechanics are set out in our note on strain relief at the connector interface.
Where the plating is a symptom rather than the cause. If a contact has lost its normal force, a better plating delays the failure without preventing it. The plating decision and the force decision are separate, and the plating side is covered in our note on connector contact materials and plating.
Where the fault is in the termination. An intermittent that survives a connector swap often lives at the crimp or the joint behind the shell, not in the contact. Our note on terminating robot harnesses separates a termination failure from a contact failure, and they are repaired in different places.
Where water is reaching the interface. Contamination ingress is a sealing problem, and a sealed connector that leaks through the cable entry will keep failing whatever the contact surface. Ingress is judged for the assembly as fitted in our note on IP ratings for robot connectors.
RFQ Checklist
- Plating system named with a minimum thickness at the mating zone and a porosity test required
- Mating cycle count given, with a contact rating that matches the duty
- Locking mechanism specified to resist vibration, with a torque value and a vibration qualification
- Current per contact stated with ambient derating and a maximum temperature rise
- Minimum contact normal force specified and measured on the finished contact
- IP class stated for the finished assembly, with seal test evidence on the fitted part
- Keying specified so a wrong mate is physically impossible, proved by a first-article trial
- Vibration or micro-motion qualification required for every contact on a moving axis
- Field diagnostic procedure agreed, naming the tests and the instruments maintenance will use
- Failure reporting agreed, so field returns come back with the evidence that identifies the cause
Conclusion
Connector failures look random until they are sorted by cause, and then they are almost predictable: fretting where the joint moves, wear where it is cycled, ingress where the seal is wrong, ageing where the current is too high, and looseness where the locking is not up to the vibration. Buyers do not diagnose these in the field; they prevent them at order time, by specifying the plating, the force, the seal and the lock for the duty the machine actually imposes.
Kexingyu Cable Group (KXYE) supplies the cable side of these joints: the continuous flex and screened constructions whose stranding and screen geometry are designed to keep motion away from the contact rather than feed it into the interface. Send us the duty and the connector schedule, and we will return constructions and sample lengths that fit; the fastest route is a request for quotation.